
Oral History: Recording
|
For all the challenges that come with the human element of oral history research, the technical issues that surround the recording process add a further layer of worry. Though repeated practice on specific equipment and careful review of the results is the only way to master this area of the work, the key points in this introduction should help you avoid some common problems. While we stick mostly to audio issues, these topics should be applicable to video interviewing. A small section of the page is devoted to advice on video recording.
Key Terms Volume:simply put, volume refers to the relative loudness of a sound. Decibel (db): this term is used as unit of measure of amplitude or loudness for audio signals, but is not a standard measure in itself. Instead, decibel readings are given in relation to a specific amplitude that has been designated as 0db. For digital recordings, 0db is usually set as the maximum amplitude that can be recorded by the equipment in question. Gain: in the context of audio recording and editing, gain refers to a change in volume between an audio signal’s input and output. Dynamic range: the difference between the softest and loudest audio signals in a recording. More sensitive microphones can capture a wider dynamic range… Channel: a channel is an independent audio signal. Both live and recorded sound can take advantage of multiple channels in order ensure that each voice or instrument is appropriately loud in the overall mix. For recording purposes, a channel or several combined channels can also be called a track. Stereo: stereo sound uses two channels, left and right, to capture or reproduce an approximation of live sound as heard in a three dimensional setting. Some microphones and recording devices are made to capture stereo sound. Newer systems, like surround sound, do this at a more sophisticated level by using more channels. Mono: this refers to a microphone or recording that only uses one channel. Mono recordings may have originated with multiple channels (recorded simultaneously or separately) but combined for the final result. |
The Recording Environment
Interview surroundings can make or break a recording. For good audio, choose a quiet location where participants are not likely to be disturbed. If you are concerned about outside noises, do not be shy about asking to move the conversation or close a window. Turn off all televisions and radios. If possible, silence or unplug phones, and turn off heating or air conditioning units and fans. Although many people will be very comfortable talking around a kitchen table, try not to place a microphone near to or pointing toward a running refrigerator. While our ears are used to tuning out all sorts of background noise during everyday conversation, the same sounds are likely to prove more distracting during playback of an audio recording.
Capturing High-Quality Sound
Changes in proximity or positioning are the easiest ways to improve both the clarity and volume of your recording. The microphone, whether internal or external, should be as close to the speaker as possible without introducing unwanted effects. It is often best to position (or aim) the microphone to the side of a speaker’s mouth, in order to avoid distortion and unwanted sounds. Keeping the microphone close will greatly reduce the amount of background noise on the recording. If the interview takes place around a table—or if the microphone is positioned on any hard surface—it is a good idea to use a microphone stand or improvised device to hold it above the surface and to lay a small towel or dishrag underneath. This will prevent distortions caused by the sound of voices reflecting directly off of the table or other surface.
|
Any recording device worth using will come with audio meters. For those familiar with audio meters on older tape recorders, it is important to note that, while older analog meters become only slightly distorted above the 0 decibel (db) mark, digital audio reaches an absolute maximum at that point, which leads to clipping, an abrasive and distracting form of distortion.
During the interview, the meters on a digital recording device should always peak (hit their momentary maximums) below 0 db. This is also true for digital audio during editing. There is some debate as to a standard peak level for digital audio, but -20 db or -12 db can serve as a good target for peaks. If the microphone is close to the source and picks up clear sound, the -20 db standard should suffice. At greater distances, experiment with the -12 db target. Also note that input options unique to each recorder may affect the optimal settings for capturing audio. You may be able to select between high and low microphone gain, as well as settings that automatically adjust gain to compensate for changes in the volume of sound being recorded. Because most interview recordings feature a narrow dynamic range, such automatic gain control features should not be necessary. Consult your user’s manual or online sources for more information on these options. |
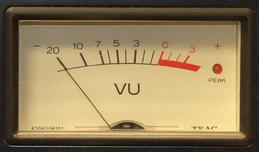

Digital audio meters look something like this.
The green and yellow bars represent instantaneous levels. The red lines indicate recent peaks. The red square next to the left channel indicates a recent peak above 0db. |
In order to check the sound during an interview, you will need to bring a pair of headphones. While there are advantages to higher end headphones, a simple pair should suffice. Simply run a brief recording test at the beginning of the interview tape and play it back through the headphones before starting the interview in earnest. If the recording volume is too low or the microphone is not close enough to the speaker, playback will be muddied by ambient noise and require increased volume on the playback device. If the sample recording features too much bass or loud pops, then the microphone may be too close to the speaker’s mouth or the input volume on the recording device may be too high. During the interview, it is a good idea, not only to keep an eye on the audio meters, but to listen to one or both headphones as the narrator speaks. Ideally, a third person can operate the recorder and monitor sound while the interviewer attends to the narrator, asks questions and takes notes.
Be Heard…
Although interviews may eventually be edited to eliminate the voice of the interviewer, later users of the recording may want or need to hear the researchers voice. This is especially true if the narrator answers a question without restating relevant details that were included in the question or if someone is interested in analyzing the conversational interaction between interviewer and narrator. There are three ways to make sure that both voices come through on the recording.
First, an interview conducted in a smaller space or with both parties close together will allow a microphone positioned to catch the narrator’s voice to adequately capture the interviewer’s voice as well.
Second, a handheld or otherwise moveable microphone can be repositioned closer to (or pointing at) the interviewer during questions or prompts. Otherwise, it should be positioned to pick up the voice of the narrator.
The third solution is to use two microphones. This option depends on the recording device being used, but will ensure that both interviewer and narrator’s voice is adequately recorded. Using more than one microphone is also a great idea when interviewing multiple narrators.
…But Only When You Want To
No matter how you solve the audibility issue, make sure that the narrator’s voice is as loud as, if not louder than, the interviewer’s. During video interviews especially, when interviewers sit closest to the camera, a recording device’s built-in microphones pick up the interviewer’s voice better than the narrators. This mistake proves very distracting during playback, and can cause problems for later editors of the material if they to include the interviewer’s voice in a multimedia excerpt.
A related issue is the tendency of listeners in any conversational context to respond audibly to a speaking individual, to confirm that they understand or are interested in the speaker’s words and/or to indicate that the present speaker should continue. Though a good interviewer should display interest in and understanding of the narrator’s testimony, visual indicators—eye contact, facial expression, nodding, even hand gestures—will convey engagement and enthusiasm without intruding on the recording. While audible responses have been less of a nuisance when oral history was more often distributed as a transcript than a digital recording, new technologies make clean, uninterrupted recordings especially desirable.
Notes on Video
For video interviews, a number of visual factors come in to play. This guide cannot address the full range of issues relating to video recording, but keep these things in mind:
1. Sunlight can be unreliable. The hue and intensity of natural light from windows will change over the course of a long interview, especially in the afternoon. Try to rely more on electric lighting.
|

|
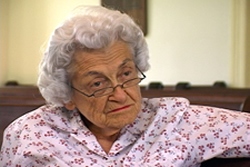
Even though the natural lighting of the lefthand shot looks good, the brightness varied over the course of this 3-hour interview. These sreenshots were taken approximately 8 minutes apart.
2. A bare white wall is a bleak background for an interview. On the other hand, too many objects beside and around the narrator may clutter the shot. If possible, the participant should be well-lit in the front of a deep field of vision. This way, a camera focused on the narrator will not pick up a distractingly detailed background.
2. A bare white wall is a bleak background for an interview. On the other hand, too many objects beside and around the narrator may clutter the shot. If possible, the participant should be well-lit in the front of a deep field of vision. This way, a camera focused on the narrator will not pick up a distractingly detailed background.

|

|
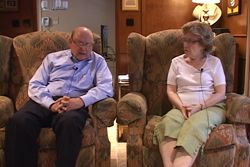
The bare wall in the shot on the left makes it easy to focus on the interview subject, but is also difficult to watch for long periods of time. However, the decorations in the shot on the right are too distracting. Finding the right balance takes time and practice.
3. Do not be afraid to alter your surroundings . Ask permission to move lamps or other furniture. Sometimes, it is even necessary to temporarily take down a piece of art or other decorations. Just remember to put everything back in order when the interview is over.
3. Do not be afraid to alter your surroundings . Ask permission to move lamps or other furniture. Sometimes, it is even necessary to temporarily take down a piece of art or other decorations. Just remember to put everything back in order when the interview is over.
|
|
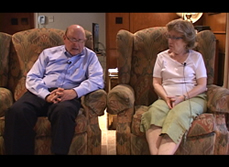
The lamp in the upper-righthand corner of this shot draws the eye because it is the brightest thing on the screen. Though the difference is subtle, cropping the screenshot on the right illustrates how the scene could have been improved.
The University of Southern California Shoah Foundation Institute has published a number of useful articles for oral historians on their website. Among these are a set of guidelines for videographers that will help you think about shot composition and other elements of the video interview.
Practice and Review
Like other aspects of research in oral history, practice is by far the best way to improve the quality of interview recordings. Try making short recordings of family or friends during your day-to-day life in order to experiment with different device settings and interview contexts. Then, move the results—audio or video—to your computer to make sure that you will be able to appropriately archive your materials. Finally, assess the quality of your recordings.
Reviewing Your Audio Recording
- Do the vocals of each participant come through clearly and at an appropriate volume? Is background noise kept to a minimum?
- Do handling noise or other movements create distracting sounds?
- Does the interviewer offer too many audible affirmations or responses to the narration?
- How has the interview space affected the quality of recorded sound?
- Are the quietest utterances loud enough on the recording?
- Are louder parts of the interview too loud?